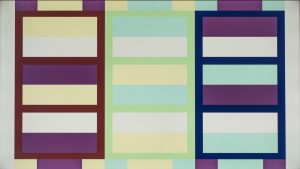
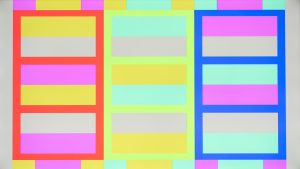
To experience art digitally with the most optimal display and ensure the best performance of the app, we recommend to set specific parameters in your TV. This guide will help to calibrate the most essential settings.
To calibrate your TV display:
- Download the model patterns and transfer them to a USB.
- Plug the USB into your TV and open it with your native image viewer program.
- Access your TV’s display settings.
- Calibrate according to the Configuration Guide below.
Considerations:
- Every TV has specific technical conditions according to its technology, location (which affects lighting) and internet connection.
- Adjusting one setting can affect another. For a perfect result, keep revising the model pattern throughout the process.
- The following settings’ names are the most common but they could be listed under a different name or not be available in your TV.
General Settings
Picture mode is a specific group of settings that provide a preset configuration.
Set picture mode to Standard or Natural to watch the WindowSight content in the least altered way. Try to avoid picture modes such as Movie, Game or Sports.
Brightness adjusts the depth of blacks on the screen. Most TVs do a good job with its own default/auto configuration.
If you want to configure it yourself:
- Open the BRIGHTNESS file of the model pattern.
- Set the brightness to the minimum value.
- Increase it until you see lines 19-21 on the left.
This setting adjusts the amount of detail present in bright images. It should be close to correct by default, but sometimes be improved with a bit of tweaking.
- Open the CONTRAST file of the model pattern.
- Set the contrast value to the minimum.
- Increase it until only lines 230-234 appear in the model pattern.
When configuring it, avoid “washing out” the image and losing information.
The Color or Saturation setting describes the depth or intensity of color present within an image.
To set the right color/saturation:
- Open the COLOR-SATURATION file of the model pattern.
- Look at the image through a blue filter.
- Adjust the color setting so that the blue box on the far left looks like the smaller gray boxes within.
Faded Color:
Correct Color:
Maximum Color:
Too much color/saturation will oversaturate the picture. Too little will wash out the color of the image.
This setting is generally correct in most TVs by default.
This setting adjusts the amount of green and red tint to the image or video on our TV. It should be set correctly by default in our TVs.
To adjust the tint-hue setting, using the model pattern:
- Open the TINT-HUE file of the model pattern.
- Look at the image through a blue filter.
- Move the parameters until the magenta and teal boxes (located in the blue and red columns) look identical.
Sharpness increases edge contrast in order to display the image more clearly. It doesn’t bring more detail or increase resolution.
To adjust Sharpness properly:
- Open the SHARPNESS file of the model pattern.
- Set Sharpness to the highest setting on your TV.
- Decrease Sharpness until the lines look normal and no geometric patterns appear.
The backlight setting determines the brightness of the LEDs that are used to light up the image. The higher the setting, the brighter the picture will be.
This setting should be adjusted to the specific viewing conditions. We recommend to avoid the ultra-high setting so as not to overexpose the image.
This setting is present in LED TVs and QLED TVs, but not in OLED TVs, since these don’t need a separate backlight.
Other Settings
Color temperature is a way to describe the light appearance provided by our TV. This setting is generally divided into warm and cold.
Adjust this setting to your specific viewing conditions. WindowSight generally recommends using the warm spectre, closer to the 6500K standard color temperature.
This setting reduces noise and distortion in the content shown. It is also referred to as Digital Clean View.
WindowSight strongly recommends not to activate it or leave it by default when displaying art in order to watch it in the most similar way to the original file.
Nevertheless, consider leaving it on when watching low resolution content, such as TV in standard definition.
Motion Interpolation, or Auto Motion Plus, is a software enhancer that makes video play smoothly by making the frame rate of the video more uniform. Occasionally, the moving element may appear with less definition.
This setting should be okay by default. If you think you can better the image’s motion with this setting, tweak it while comparing and testing it with different videos until satisfied.
Dynamic contrast darkens the shadows and brightens up the highlights thus giving the impression of a greater contrast.
We strongly recommend turning off Dynamic Contrast because it can cause color banding and considerably affect the final image.
Local Dimming brightens up the lighter parts of the image without altering the darker parts. Not all TVs include this setting and just a few TVs give good results.
This setting should be adjusted to the specific viewing conditions.
The Eco Mode (economy mode) adjusts the brightness of your TV in order to reduce the power consumption and is recommended during extended periods of time. Bear in mind that artworks may be displayed less accurately than its original version with Eco Mode.
To display the entirety of the media, select the option to fit content to screen.
We strongly recommend not to turn on this feature in your TV. Not all content displays properly in HDR.
Through HDR10 or Dolby Vision, High Dynamic Range (HDR) captures, processes and reproduces content in a way that the detail in the shadows and highlights is increased. As a result, it offers a higher experience of color, clarity and realism than the Standard Dynamic Range (SDR).


